Cleaning validation is an essential process in the life sciences industry. Think of it as a thorough check-up for manufacturing equipment, making sure it’s completely clean and free from any leftover substances, germs, or contaminants. This process is crucial because it helps maintain product quality, prevents cross-contamination, and complies with stringent regulatory requirements set by agencies like the FDA, EMA, and WHO. Here, you can also find out how systems like Ampleogic’s Cleaning Validation can help you in the process.
If you’re curious about how this all works, We have put together a straightforward guide that walks you through the steps of gmp cleaning validation in the pharmaceutical and lifesciences industry. Let’s explore it together!
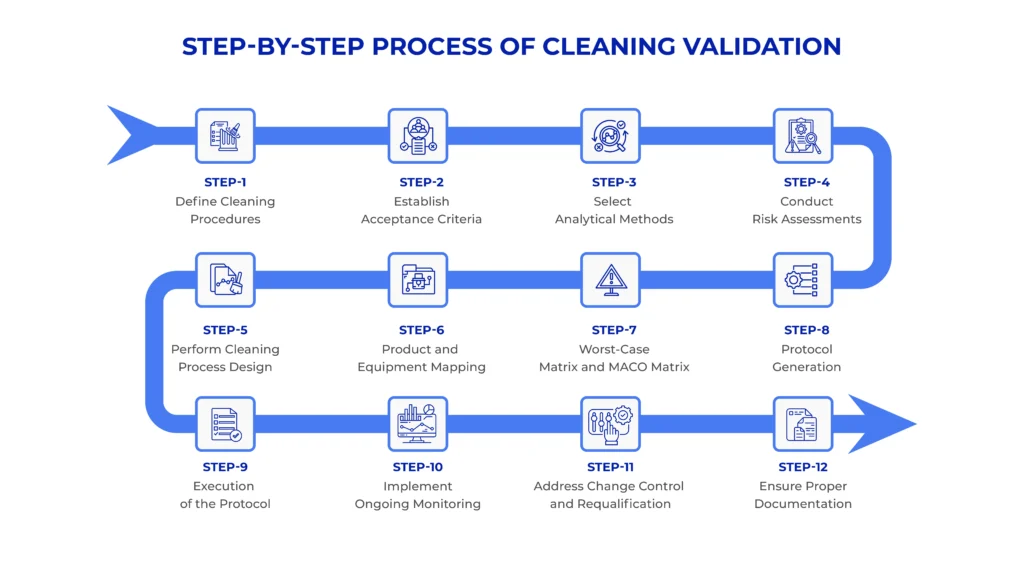
Step 1: Define Cleaning Procedures
The first step in gmp cleaning validation is developing detailed Standard Operating Procedures (SOPs) for cleaning equipment. These procedures outline:
- The cleaning agents to be used.
- Specific analytical methods based on the type of API and detergent used.
- Frequency of cleaning based on product type and equipment usage.
- Factors such as residue solubility, equipment design, and the nature of the products being manufactured.
This step ensures consistency and provides a clear framework for cleaning validation studies.
Step 2: Establish Acceptance Criteria
Acceptance criteria define the maximum allowable levels of residues after cleaning. These limits are determined based on:
- Risk assessments considering toxicity, potency, solubility, risk priority number (RPN), the 2S+P+T approach, and surface area limits.
- Regulatory guidelines such as Maximum Allowable Carryover (MACO), which calculates residue limits scientifically.
Acceptance criteria must be specific to each product and equipment type to ensure compliance and safety. The Amplelogic Cleaning Validation System can easily help you set the criterion in place.
Step 3: Select Analytical Methods
Choosing appropriate analytical methods is essential for detecting and quantifying residues. Common techniques include:
- High-Performance Liquid Chromatography (HPLC): Measures chemical residues with high sensitivity.
- Total Organic Carbon (TOC) Analysis: Detects organic contaminants.
- Microbiological Testing: Identifies microbial contamination.
All selected methods must be validated to ensure accuracy, sensitivity, and reproducibility, and this can be seamlessly integrated through an automated cleaning validation system by Amplelogic.
Must Read – Ensuring Quality Through Cleaning Validation Software in Pharmaceutical Manufacturing
Step 4: Conduct Risk Assessments
A risk-based approach helps prioritize resources by focusing on areas with higher contamination risks. This involves:
- Evaluating potential cross-contamination risks using scientific knowledge.
- Identifying critical equipment or processes that require stricter cleaning protocols.
- Setting proportional actions based on identified risks.
This ensures efficient allocation of resources while maintaining compliance and with the use of automated cleaning validation.
Step 5: Perform Cleaning Process Design
Before implementation in manufacturing facilities, automated cleaning processes must be carefully designed under controlled conditions. This involves:
- Testing different cleaning agents and methods to determine their effectiveness.
- Documenting all procedures thoroughly to ensure reproducibility.
This stage ensures the cleaning process is efficient enough to handle worst-case scenarios.
Step 6: Product and Equipment Mapping
This step involves mapping products to the equipment used during production to prevent cross-contamination and ensure proper gmp cleaning validation. The important actions include:
- Identifying Equipment Contact Points: Determine which equipment comes in contact with different APIs, excipients, or detergents.
- Assessing Potential Residue Risks: Analyze how product characteristics (e.g., solubility, potency) affect residue carryover.
- Linking Products to Equipment: Create a detailed map showing product-equipment connections to guide cleaning protocol design.
By conducting thorough product and equipment mapping, manufacturers can effectively reduce contamination risks and design tailored cleaning methods.
Also Read – Streamlining Cleaning Validation in Pharmaceutical Manufacturing with MES Systems
Step 7: Worst-Case Matrix and MACO Matrix
Developing worst-case and MACO (Maximum Allowable Carryover) matrices is critical to establishing robust residue limits. Key tasks include:
- Worst-Case Matrix Development: Identify the “worst-case” product based on critical parameters like:
- Toxicity
- Potency
- Solubility
- Risk Priority Number (RPN)
- MACO Matrix Calculation: Set residue limits for each product-equipment combination based on MACO guidelines. This ensures compliance with regulatory standards and protects patient safety.
- Prioritizing Cleaning Efforts: Focus resources on high-risk areas by targeting products and equipment combinations with higher contamination potential.
These matrices enable manufacturers to implement effective cleaning protocols that address real-world contamination risks. You can take the help of AI-powered software like Cleaning Validation System by Amplelogic to simplify your process.
Step 8: Protocol Generation
Cleaning process qualification evaluates whether the designed procedures are effective and reproducible under real-world conditions. This phase includes:
- Performing multiple cleaning cycles under specified conditions.
- Testing equipment cleanliness using analytical methods after each cycle.
- Documenting results to confirm that residues are consistently reduced below acceptable limits.
Qualification studies often incorporate worst-case scenarios to test the efficiency of the cleaning process.
Step 9: Execution of the Protocol
Validation studies provide documented evidence that the cleaning procedures consistently meet established acceptance criteria. These studies include:
- Visual Inspections: Ensures no visible residues remain on equipment surfaces.
- Sampling Methods:
- Swab Sampling: Direct surface sampling for residue analysis.
- Rinse Sampling: Analyzing rinse water for contaminants.
- Placebo Sampling: Using placebo batches to detect carryover residues.
- Swab Sampling: Direct surface sampling for residue analysis.
- Analytical Testing: Confirming residue levels are below MACO limits.
Thorough documentation of validation results is essential for regulatory compliance.
You can get Amplelogic’s Cleaning Validation solution here –
Step 10: Implement Ongoing Monitoring
Once validated, cleaning processes require continuous monitoring to ensure they remain effective over time. This involves:
- Regular verification of cleanliness after each batch or campaign through chemical analysis.
- Periodic revalidation whenever there are changes in products, equipment, or procedures.
- Implementing change control processes to address modifications systematically.
Ongoing monitoring ensures long-term compliance and effectiveness of cleaning procedures.
Step 11: Address Change Control and Requalification
Any changes in manufacturing processes, such as new product introductions or equipment upgrades, require requalification of cleaning procedures. This includes:
- Revisiting risk assessments based on new conditions.
- Adjusting acceptance criteria if necessary.
- Conducting additional validation studies to confirm effectiveness under new circumstances.
Change control ensures that modifications do not compromise cleanliness or compliance standards in lifescience cleaning validation.
Also Read – Cleaning Validation Guidelines in Pharmaceutical Industry
Step 12: Ensure Proper Documentation
Documentation is the backbone of lifescience cleaning validation. It includes:
- Detailed SOPs outlining cleaning procedures.
- Validation protocols specifying study designs and criteria.
- Validation reports summarizing results and conclusions.
- Records of ongoing monitoring activities.
Proper documentation ensures traceability, supports regulatory inspections, and demonstrates compliance with global standards like FDA 21 CFR Part 11 and EMA Annex 15 in pharmaceutical cleaning validation.
Best Practices in Cleaning Validation
To enhance the effectiveness of pharmaceutical cleaning validation programs, manufacturers should adopt the following best practices:
- Risk-Based Approach
Focus resources on high-risk areas by conducting thorough risk assessments and setting proportional actions based on contamination risks.
- Periodic Revalidation
Regularly revalidate cleaning processes to account for changes in products, equipment, or procedures.
- Continuous Improvement
Review validation results periodically to identify areas for improvement. Implement corrective actions through CAPA (Corrective Action Preventive Action) programs.
- Training Personnel
Ensure all staff involved in gmp cleaning validation are properly trained on SOPs, analytical methods, and regulatory requirements.
- Regulatory Guidelines for Cleaning Validation
Cleaning validation must comply with global regulatory standards while complying with Good Manufacturing Practices (GMP):
- FDA Guidelines
The FDA emphasizes thorough documentation of cleaning procedures, acceptance criteria, validation protocols, and final reports demonstrating compliance.
- EMA Guidelines
The EMA focuses on health-based exposure limits, risk assessments, and regular revalidation of cleaning processes to prevent contamination risks.
- ICH Guidelines
ICH Q7 highlights scientifically justified cleaning procedures tailored to product characteristics and manufacturing processes.
For further details must read – Best Practices for Implementing Cleaning Validation in Pharma
Conclusion
Pharmaceutical cleaning validation is a critical aspect of life sciences manufacturing as well. It ensures equipment cleanliness while safeguarding product quality and patient safety. By following this step-by-step guide – defining procedures, setting acceptance criteria, conducting validation studies, implementing ongoing monitoring, and adhering to regulatory guidelines – manufacturers can achieve efficient compliance while minimizing contamination risks. Embracing best practices like risk-based approaches and continuous improvement further strengthens these programs for long-term success in pharmaceutical manufacturing.
For tailored solutions that elevate your compliance efforts while saving time and resources, contact info@amplelogic.com or visit www.amplelogic.com today! Additionally, if you want to read more such informative articles, you can visit our page – AmpleLogic Resources!

